
Showing posts with label food. Show all posts
Make your own Snowskin Mooncakes
Hello~ It's the time of the year again to play with lanterns and get busy over buying mooncakes, for your family, your friends or even your clients. For this year's Mid Autumn Festival, why not go for a change and make yourself some Mooncakes? :) You can share this home-made delicacy with your family and friends. Best thing is, you can be assured that there are no preservatives :)
 |
| Chocolate, Greentea & White Lotus Snowskin Mooncake. |
Here's the recipe for you:
 |
| Commercial kou fien. |
100g commercial kou fien (糕粉)
100g icing sugar
40g shortening
150ml fresh milk or flavoured milk (choose a flavour that complements your mooncake's filling)
Filling
500g White Lotus paste (莲蓉馅) / Chocolate paste / Black Sesame paste / Green Tea paste / Durian paste (choose your preferred)
Note*
You should be able to find ready-made fillings from Phoon Huat or other confectioneries.
Equipment
Mooncake mould to shape the mooncakes.
Directions

1. Combine filling together and scale at 20g each portion. Round them and set aside.
2. Sieve commercial koh fun and icing sugar into a big bowl. Add in shortening first and combine evenly. Next, add in fresh milk and knead well. The dough should come to a consistency that doesn't stick to your fingers that much. Scale and make them into portions of 30g. Round them and set aside. This will be your snowskin.
 |
| Separated portions of rounded dough. |
 |
| Seal up the opening to cover filling. |
 |
| Press dusted dough into the mould. |
 |
| Remove the imprinted mooncake. |

6. You may buy some boxes that comes with separate compartments to keep your mooncakes. Put the mooncakes in the fridge to chill before serving.
 |
| Azu-nyan: "Please consume your mooncakes within 5 days, from the day you make them." |
 |
| Azu-nyan: "Snowskin Mooncakes become drier the longer you keep them in the fridge!" |
Mini Churros
Sharing this easy and enjoyable snack to make - Churros~! It's a Spanish fried-dough pastry. They come originally as either thin (and sometimes knotted) or long and thick (porra). They are both normally eaten for breakfast dipped in hot chocolate or café con leche. People start make them into all shapes and sizes thereafter. I've decided to make it bite-size so it's easy to handle and suitable as an afternoon snack ^^
Here's the recipe, please enjoy~ :)

For the churros
1/2 cup plus 1 1/2 Tablespoons sugar, divided1 1/2 teaspoons ground cinnamon
1 cup water
1/2 teaspoon salt
2 Tablespoons plus 2 quarts vegetable oil, divided
1 cup all-purpose flour
For the chocolate sauce
3 1/2 ounces dark chocolate, chopped1/2 cup heavy cream
Equipment
a cloth pastry bag or heavy-duty plastic pastry bag
a large star pastry tip (such as Wilton #2110)
Note*
It's important to use a cloth or heavy-duty plastic pastry bag. A regular resealable plastic bag is not thick enough and may split open if you try to pipe the churro dough through it.
A pastry tip isn't essential, however using the large star-shaped tip will give the churros the textured lines you see in the photos.
Directions:
1. Combine 1/2 cup sugar with the cinnamon in a shallow bowl. Set aside. Line a plate with paper towels.

2. In a small saucepan over medium heat, whisk together the water, 1 1/2 tablespoons sugar, salt and 2 tablespoons vegetable oil. Bring the mixture to a boil then remove it from the heat.

3. Stir in the flour, mixing until it forms a ball. Let the dough mixture cool off for a while before you transfer it into a cloth pastry bag or heavy-duty plastic bag fitted with a large star tip.

4. Heat 3 to 4 inches of vegetable oil in a heavy-bottomed pot set over medium-high heat. There should be a minimum of 3 inches above the oil to prevent it from bubbling over.

5. Pipe the dough over the pot of oil to a length of about 4 inches, then using scissors or a sharp knife, cut it so it releases into the oil. (Stand back to avoid any splatters.) Pipe two to three churros into the oil at a time, frying them until they're golden brown and cooked through.

6. Transfer the churros to the paper towel-lined plate to drain for 2 minutes, then roll them in the cinnamon-sugar mixture. Repeat the frying and coating process with the remaining dough.
Serve the churros with the warm chocolate sauce (recipe below).

Make the chocolate sauce:
Prepare a water-bath - Fill a pot with 1/3 full of water, set it over low-medium heat and place a glass bowl over it. We are going to melt the chocolate this way as direct heating of chocolate can burn it.

Pour the heavy cream and chopped chocolate or chocolate pellets together in the glass bowl. Let it sit for 1 minute then stir to combine.
The chocolate sauce will thicken as it cools, so it's best to make it right before you're ready to serve it with the churros.
 |
| 食べます~ Tabemasu~ |
Enjoy cooking~!
Fluffy Pancakes~

Sharing an all-time favourite recipe that I've used over and over again, to create "Fuwa Fuwa" (adapted from K-On!) or Fluffy Pancakes! Pancakes seem to be so easy to make. But, getting the batter and consistency right is the key to making pancakes fluffy and light! :D
It is a good recipe to start with especially if you have zero experience in cooking, because it's easy to deal with and it doesn't turn your kitchen messy at all. You will not need to rely on instant pancake-mix any more and having to taste the same pancakes every time. You can create a variation of pancakes just by tweaking the recipe a little bit! Best of all, I think it is a good activity to do together with your family, your friends, your boyfriend, your girlfriend, your neighbour etc etc and have a really good bonding time! ^^
So, here is today's simple recipe:
"Fuwa Fuwa" Fluffy Pancakes
Servings: Approx. 8 or more (depends on size you make)
Ingredients
180ml fresh milk
2 tablespoons white vinegar (I usually replace this with same amount of freshly squeezed orange juice)
1 cup all-purpose flour
2 tablespoons white sugar
1 teaspoon baking powder
1/2 teaspoon baking soda
1/2 teaspoon salt
1 egg
2 tablespoons butter, melted
2 tablespoons butter, melted
Directions

1. Combine milk with orange juice in a medium bowl and set aside for 5 minutes to "sour".
*Note: This is an important process to "sour" the milk. Please do not skip this.
The outcome is almost the same as if you would to use buttermilk instead. But, buttermilk is more expensive and may not be easily available in convenient stores or supermarket.


3. Whisk egg and melted butter into "soured" milk set earlier on.

4. Pour the wet mixture into the flour mixture and mix lightly until the large chunks of lumps are gone.
 |
| No huge lumps in the mixture. |
*Note: The key here is to NOT over-mix your batter. You do not want to stir it too vigorously and turn the mixture all watery. Mix it lightly, just enough to ensure that there are no huge lumps in the mixture. As a rough guide, this should not take you more than 1 min.
 |
| Bubble appear on the surface. |
5. Heat a large non-stick frying pan over medium heat, and coat with a teaspoon of butter. Pour a ladle full of pancake mixture onto the frying pan, and cook until bubbles appear on the surface. Flip with a spatula, and cook until browned on the other side.
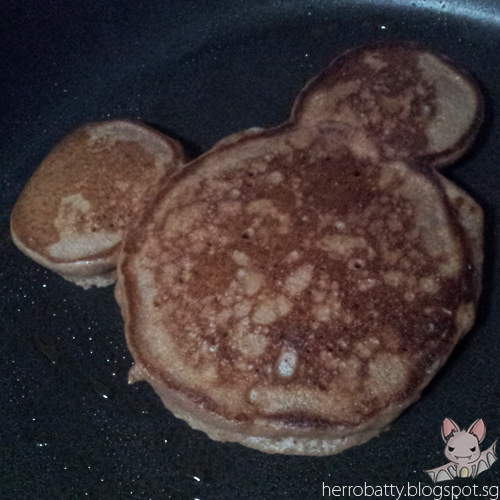 |
| You should see that your pancake becomes puffy fluffy as it gets cooked :3 |


